
LED flex strips are exposed to various harsh conditions, from wind to dust, impacting their performance and durability. Achieving a proper LED flex strip installation becomes crucial, necessitating a deep understanding of different mounting techniques. To embark on this enlightening journey, let’s delve into the world of mounting techniques, ensuring your LED strips not only adhere securely but also emit an even, enchanting light.
Mounting techniques are essential methods for securing LED strips to a surface. The way you mount these strips significantly impacts their stability and the uniformity of light distribution. Broadly, there are three primary mounting techniques for installing LED strips – adhesive, clip, and channel mounting. The choice among these techniques varies based on the specific application requirements. Each method offers distinct advantages, ensuring your LED strips are securely in place and emitting light consistently.
What is the Mounting Technique for LED Strips?
The mounting technique for LED strips is the art of securely installing them. This involves attaching the LED strip to surfaces like walls or ceilings, ensuring it stays firmly in place. However, not all mounting techniques are universal. Choosing the right one is crucial to avoid incorrect installations.
Types of Mounting Techniques
A. Adhesive Mounting
Adhesive mounting involves securing LED strips using double-sided adhesive tapes. Various types of adhesives exist, such as
- 3M 200MP
- 3M 300MP
- 3M 9080
- 3M VHB 5608N
- Tesa 4965
- Blue Thermal Tape
The choice depends on your specific needs.Of all these, 3M VHB is the strongest one. To know more about double-sided tapes for LED strips, check this How to Choose The Right Adhesive Tapes For LED Strip.
Pros
- Quick installation
- Requires no drilling or screwing
- Time-saving and cost-effective
Cons
- May become loose over time
- Potential wall damage during tape removal
B. Clip Mounting
In the clip mounting method, LED strips are affixed to a surface using clips, which can be either metallic or plastic. This mounting technique, offering enhanced stability compared to adhesive methods, involves processes such as drilling, nailing, and screwing. Let’s explore the various types of clips available for mounting LED strips:
1. Types of Clips for LED Strip Mounting
When selecting clips for mounting LED strips, you encounter a variety of options, each catering to specific needs. Here are some popular and practical clips used for strip mounting:
a. One-side Bracket Fixing Clip
These clips feature a bracket-shaped structure that holds the LED strips, and a single-sided screw secures them to the surface. One-side bracket fixing clips are the most common choice for LED strip mounting. They are not only cost-effective but also readily available.
b. Angle Adjustable Clips
Ideal for those seeking a customizable LED strip installation, angle-adjustable clips allow you to alter the beam angle of your LED fixture. This flexibility is valuable for achieving specific lighting effects.
c. Clips with Adhesive Backing
Clips equipped with adhesive backing offer a convenient solution for LED strip mounting. These clips securely hold the strips, and the adhesive ensures firm attachment to the surface. The advantage is that no drilling or screwing is required, simplifying the installation process.
d. E-Clips
E-clips stand out as an excellent option for those installing LED strips in aluminum profiles. Available in both metallic and plastic variations, these clips have an ‘E’ shape that maintains the LED strips straight on the surface, creating a seamless lighting effect.
Beyond these, various other clip varieties are available in the market, offering flexibility in choosing the most suitable option for your specific installation requirements.
Selecting the right clip type depends on factors such as the desired aesthetic, the nature of the surface, and whether you prefer a permanent or temporary LED strip installation. Evaluate these factors to choose the clips that best align with your project goals.

2. Pros and cons of clip mounting
Pros
- Ensures proper securing of the strips
- Excellent for outdoor installation
- Ideal for permanent solutions
Cons
- Requires drilling
- Time-consuming installation
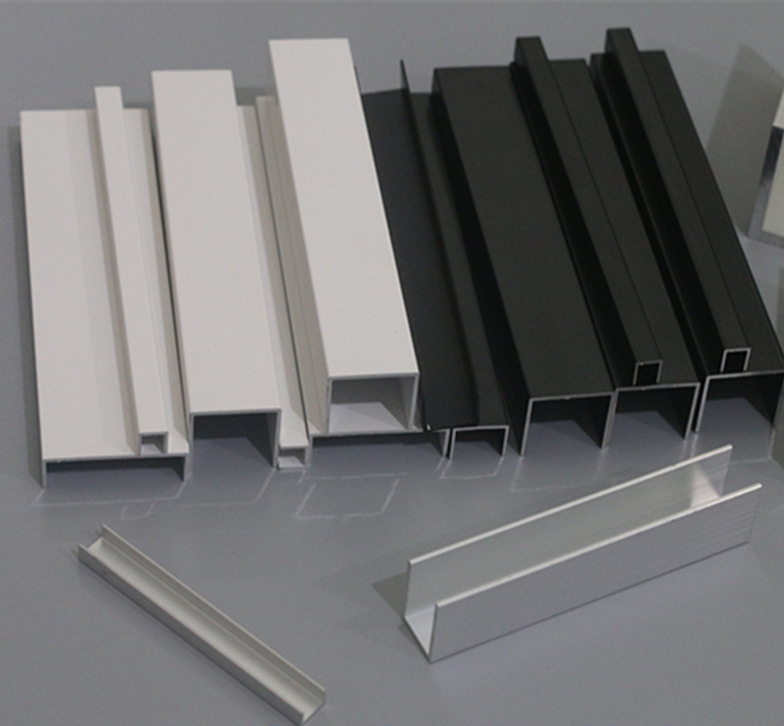
C. Channel Mounting
Channel mounting, an excellent option, protects LED strips from dust and dirt, enhancing their longevity. Various types of channels include standard aluminum, diffuser aluminum, serrated aluminum, and bendable channels.
Channel Mounting
Channel mounting emerges as an excellent choice for the installation of LED strips, offering robust protection against dust, dirt, and unexpected substances. This not only enhances the longevity of LED strips but also ensures optimal performance. Let’s explore the various types of channels available for LED strip mounting:
1. Types of Channel Mounting
LED channels come in various materials, including plastic, aluminum, or steel. Among these, aluminum channels stand out as the most popular for mounting LED strips due to their ultra-lightweight nature. Here are some common types of channels used for LED strip mounting:
a. Standard Aluminum Channel
- Description: The most commonly used channels for LED strip mounting.
- Characteristics: Basic design, thickness, fracture-proof, and affordability.
b. Diffuser Aluminum Channel
- Description: Features a transparent covering on the top, creating a diffused lighting effect.
- Diffuser Types: Clear, frosted, and opal, each providing different lighting illusions.
- Consideration: Available in various sizes and heights, influencing brightness and diffusion. Closer proximity to the LED strips yields brighter and less diffused light.
c. Serrated Aluminum Channel
- Description: Ideal for ceiling-suspended LED strips.
- Features: Internal elastic racks to hold the strips tightly and protect against friction or damage due to falls.
d. Bendable Channel
- Features: Offers ultimate flexibility, accommodating both vertical and horizontal bending strips.
Beyond these, there are additional channel types, including flange aluminum profile, thickened plastic channel, 316 stainless steel channel, hybrid channel, and more. However, aluminum channels outshine plastic or steel counterparts due to their lightweight nature and resistance to corrosion. For an in-depth understanding of aluminum channels, refer to the “Ultimate Guide To Aluminum Profile For LED Strip.”

2. Pros and Cons of Channel Mounting
Channel mounting presents several advantages, accompanied by a few drawbacks. Let’s explore the pros and cons of this method:
Pros:
- Protects LED strips from dust and dirt.
- Ideal for submerged installation.
- Provides a seamless lighting effect.
- Shapes flexible LED strips properly.
- Conceals LED strips, maintaining an appealing appearance even when lights are turned off.
Cons:
- More expensive.
- Time-consuming installation process.
Choosing channel mounting involves a careful consideration of these pros and cons, aligning with specific project requirements. If protection, aesthetics, and a seamless lighting effect are top priorities, channel mounting proves to be a worthwhile investment despite the associated costs and installation time.
Factors to Consider When Choosing a Mounting Technique
Factors to Consider When Choosing a Mounting Technique
Selecting the right mounting technique for installing LED strips is crucial, and various factors should influence your decision. Here are key considerations to help you make an informed choice:
A. Surface Material
The type of surface you’re working with plays a pivotal role in determining the suitable mounting technique for LED strips. Consider the following:
- Plaster or Brick Walls: Clipping and screwing techniques work well for these surfaces, providing secure installation. This method is also suitable for paper-printed walls. Adhesive techniques may damage the design and texture of these walls.
- Tiled Surfaces: Adhesive techniques, particularly using double-sided tape, are ideal for tiled surfaces. They prevent permanent damage to the tiles. Ensure the surface is smooth for successful adhesive mounting.
B. Environment
The environmental conditions of the installation site are crucial for choosing the optimal mounting technique. Take the following into account:
- Outdoor Installation: Channel mounting techniques shine in outdoor settings. Aluminum channels protect LED strips from elements like dust and rain. Ensure the LED strips themselves are waterproof for maximum protection.
C. Ease of Installation
Consider the ease of installation, especially if you’re a beginner. Opt for methods that minimize complications:
- Adhesive Technique: If you’re new to installing LED strips, the adhesive technique is a straightforward solution. Using double-sided tape on the strip’s back and pressing it onto the surface is quick and easy. No need for clipping, screwing, or drilling.
D. Aesthetics
The visual appeal of your LED strip installation is essential for creating the desired ambiance. Explore creative and aesthetically pleasing methods:
- Channel Mounting: For a sophisticated look, consider channel mounting techniques. Suspend LED strips from the ceiling for an elegant appearance. Channel mounting allows for creative and visually appealing installations that enhance the interior aesthetics.
These factors collectively contribute to choosing the ideal mounting technique tailored to your specific needs and preferences. Whether prioritizing surface protection, ease of installation, environmental considerations, or aesthetics, aligning your choice with these factors ensures a successful LED strip installation.
Steps to Install LED Flex Strips Using Different Mounting Techniques
A. Adhesive Mounting Technique
1. Surface Preparation
Prepare the surface by cleaning it thoroughly. Ensure it’s dry and free from dust or debris.
2. Applying Adhesive
Apply adhesive to the back of the LED flex strip. If the strip lacks adhesive backing, use double-sided tape. no worry about MSHLED, All of our LED strips include adhesive backing.
3. Installing LED Flex Strip
Align the LED strip with the surface and press it down firmly. Cut the strip if necessary, connect the power supply, and test the lights.
B. Clips Mounting Techniques
1. Prepare the Base
Clean and measure the mounting surface. Use a level to ensure it’s flat and mark the clip placements.
2. Installing Clips
Choose the right clip type and secure them to the surface. Align the clips with the LED strip markings.
3. Inserting LED Flex Strip into Clips
Ensure the LED strip is clean and align it with the clips. Press the strip into the clips securely and connect it to the power source.
C. Channel Mounting Technique
1. Measuring and Cutting the Channel
Measure the LED strip length and cut the channel accordingly, using a miter saw or a metal cutting blade.
2. Placing the Flex Strip in the Channel
Insert the LED strip into the channel, ensuring proper alignment. Close the channel with a diffuser of your choice.
3. Mounting the Channel
Use clips, screws, or double-sided tape to mount the channel onto the surface. Connect the power source once it’s securely in place.
How To Create a Seamless Lighting Effect With Mounted LED Flex Strips?
Achieving a seamless lighting effect involves meticulous measurement and planning. Determine the desired length, shape, and area to cover. Cut and connect the strips, then mount them using your preferred technique. Finally, connect all strips to a power source for a captivating lighting display.
Importance of Proper Mounting Techniques For LED Strips
- Firm Adherence: Proper mounting ensures LED strips stick firmly, preventing unexpected detachment.
- Time Efficiency: Following correct mounting procedures saves time during installation, making the process systematic.
- Environmental Protection: Techniques like channel mounting safeguard LED strips from dust and moisture, enhancing their lifespan.
- Improved Thermal Efficiency: Correct mounting allows airflow, improving heat dissipation and extending LED lifespan.
Therefore, understanding different mounting techniques is paramount for successful LED strip installations.
FAQs
- What is the best mounting technique for outdoor LED strip installations?
- Answer: Clip mounting is excellent for outdoor installations as it ensures proper securing of the strips.
- Can adhesive-mounted LED strips be removed without damaging the wall?
- Answer: While adhesive mounting is removable, there’s a chance it may damage the wall. Exercise caution during removal.
- Are aluminum channels necessary for LED strip mounting?
- Answer: Aluminum channels provide protection and a seamless lighting effect, but they are not mandatory.
- Which adhesive tape is recommended for LED strip mounting?
- Answer: 3M VHB 5608N is a strong adhesive tape suitable for mounting LED strips.
- Is clip mounting suitable for temporary installations?
- Answer: Clip mounting is more ideal for permanent solutions, as it requires drilling and is time-consuming.
Last Words
Before installing your LED strips, dive into the realm of mounting techniques. Choose the one that aligns with your project, ensuring a successful and aesthetically pleasing outcome.


