
How to Cut and Connect LED Light Strips
LED strip lights offer incredible flexibility. Unlike rigid lighting fixtures, these strips can be easily customized to fit any space. Most LED strips come in standard lengths, but don’t worry if you need something shorter. Many strips are designed to be cut at specific intervals without compromising their functionality.
However, before you grab a pair of scissors, it’s essential to understand the specific cutting guidelines for your LED strip. Improper cutting can damage the strip and affect its performance. In the next section, we’ll delve into the crucial factors to consider before taking the plunge.

Can You Cut LED Strip Lights?
Yes, LED strip lights can be cut to fit your desired length. LED strips are designed with designated cutting points along the strip, usually indicated by a line or a small scissor icon. These cutting points are placed between the copper pads of each LED segment, allowing you to cut the strip without damaging the rest of the LEDs.
How to Cut LED Strip Lights: Step-by-Step Guide
- Measure and Mark: Measure the area where you want to install the LED strip lights. Mark the strip at the nearest cutting point to your desired length.
- Find the Cutting Line: Look for the scissor icon or a thin line between the copper pads on the strip. This is the designated cutting point.
- Use Sharp Scissors: Use a pair of sharp scissors to make a clean cut along the marked line. Ensure the cut is straight and clean to avoid damaging the circuit.
- Test the Strip: After cutting, you can test the strip to ensure it still works. If the strip has been cut correctly, the remaining sections should light up as intended.

How to Connect Cut LED Strip Lights
After cutting the LED strip lights, you may want to connect the segments together or attach them to a power source. Here’s how you can do that:
Method 1: Using Connectors
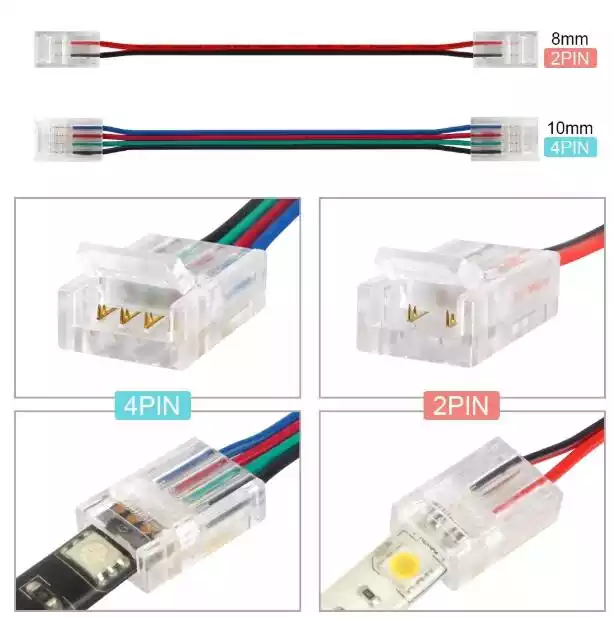
- Select the Right Connector: Choose a connector that matches the type and width of your LED strip (e.g., 2-pin for single-color strips, 4-pin for RGB strips).
- Open the Connector: Open the connector clip and carefully insert the cut end of the LED strip into it, ensuring the copper pads align with the connector’s metal pins.
- Close the Connector: Snap the connector shut to secure the connection. Some connectors may have a latch or clip to ensure a tight fit.
- Test the Connection: After connecting, test the strip to ensure all LEDs light up correctly. If any part doesn’t light up, check the alignment and try again.
Method 2: Soldering
- Prepare the Strip: Strip the protective coating from the copper pads at the end of the strip.
- Tin the Wires: Apply a small amount of solder to the exposed copper pads on the strip and to the ends of the wires you’re connecting.
- Solder the Connection: Place the wire onto the tinned copper pad and apply heat with a soldering iron until the solder melts and creates a secure connection.
- Insulate the Connection: Use heat shrink tubing or electrical tape to insulate the soldered connection and prevent short circuits.
- Test the Connection: Test the strip to ensure the connection works properly.
more article read: How To Connect Multiple LED Strip Lights?

Additional Tips
- Match Voltage: Ensure the power supply matches the voltage rating of your LED strip lights (usually 12V or 24V).
- Avoid Overloading: Don’t connect too many strips in series, as it can lead to voltage drop and reduced brightness. Use amplifiers or additional power supplies if needed.
- Use Waterproof Connectors: If installing LED strips in a wet or humid environment, use waterproof connectors and strips rated for outdoor use.
Extending Your LED Strip Light Installation
Suppose you need a longer run of LED strip lights. In that case, you can extend them by either connecting additional strips end-to-end or using an amplifier to maintain consistent brightness over longer distances.
Method 1: End-to-End Connection
- Use Appropriate Connectors: To connect two strips directly, use strip-to-strip connectors that match the type and width of your LED strips.
- Align and Connect: Align the copper pads of both strips with the connector’s metal pins and securely clip them together.
- Test After Each Connection: After connecting additional strips, test the entire length to ensure all sections light up consistently.
- Power Considerations: Ensure your power supply can handle the total wattage of the extended strip. If it exceeds the power supply’s capacity, consider using a more powerful supply or an additional one. you can read the post: How to Connect LED Strip to Power Supply?
Method 2: Using an LED Amplifier
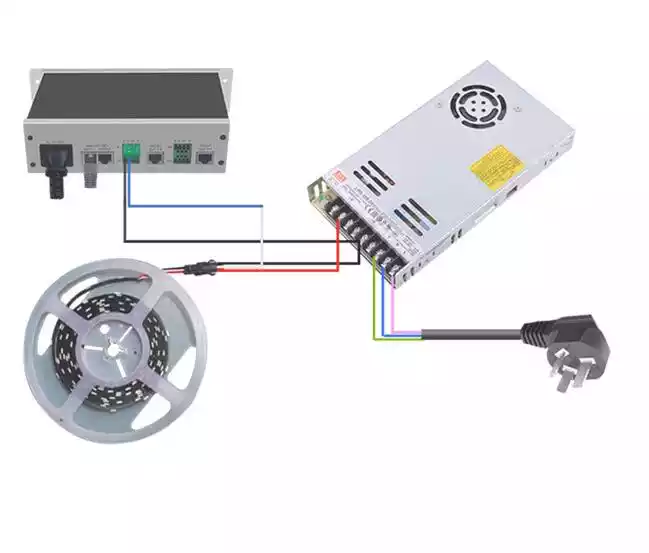
- Understand the Need for Amplifiers: When connecting multiple strips over long distances, you may experience a voltage drop, causing the lights to dim. An LED amplifier boosts the signal and ensures consistent brightness throughout the strip.
- Install the Amplifier: Place the amplifier between the power supply and the extended strips. Connect the input side of the amplifier to the power supply and the output side to the strips.
- Connect Power to the Amplifier: Some amplifiers require a separate power source, so ensure it’s connected correctly.
- Test the Setup: After installation, test the entire length to verify consistent brightness.

Troubleshooting Common Issues
1. LED Strip Lights Not Working After Cutting
- Check the Cutting Point: Ensure that the cut was made precisely along the designated line, and the copper pads are intact.
- Inspect Connectors: If using connectors, check that they are aligned correctly with the copper pads and that the connection is secure.
- Test the Power Supply: Make sure the power supply is functioning properly and providing the correct voltage. read article: How to Connect LED Strip to Power Supply?
2. Dim or Uneven Brightness
- Voltage Drop: This may occur if the strips are too long or if multiple strips are connected in series without proper power management. Using an amplifier or running power to both ends of the strip can help.
- Insufficient Power Supply: Ensure that the power supply is adequate for the total wattage of the strips.
- Poor Connections: Check all connections for any loose or faulty wiring.
3. LED Strip Lights Flickering
- Check Power Supply: Flickering can be caused by an unstable power supply. Ensure it matches the strip’s requirements.
- Loose Connections: Inspect all connections, including connectors and solder points, for any instability.
- Overloading: If too many strips are connected to a single power supply, this could cause flickering. Consider adding an additional power source.
4. Incorrect Colors on RGB Strips
- Check the Controller: If your RGB strips are displaying incorrect colors, the issue might be with the controller. Ensure it’s compatible and correctly connected.
- Wiring Issues: Double-check the wiring connections, particularly the RGB pins, to make sure they align properly.
- Defective Strip: If only a section is displaying incorrect colors, that portion of the strip may be defective and need replacement.
Final Installation Tips
- Use Proper Adhesives: If the strip’s adhesive backing is insufficient for your surface, consider using additional mounting clips or stronger adhesive tape to ensure a secure installation.
- Plan Your Layout: Before cutting or connecting strips, plan your layout to minimize the number of cuts and connections needed.
- Consider Heat Management: For high-power strips, ensure there’s adequate ventilation or heat dissipation, especially if installing in enclosed spaces.


